How do I set the grub timeout and the grub default boot entry?
In Ubuntu 12.04 (or above), how do I set the GRUB time and the default OS (that I see at boot time) as I'm dual-booting Windows (7/8) and Ubuntu (12.04 or above)?
210 Answers
- Press Alt + F2, type
gksudo gedit /etc/default/grubpress Enter and enter your password. You will see the following contents:
GRUB_DEFAULT=0
GRUB_HIDDEN_TIMEOUT=0
GRUB_HIDDEN_TIMEOUT_QUIET=true
GRUB_TIMEOUT=10
GRUB_DISTRIBUTOR=`lsb_release -i -s 2> /dev/null || echo Debian`
GRUB_CMDLINE_LINUX_DEFAULT="quiet splash"
GRUB_CMDLINE_LINUX=""
You can change the default from 0 to any number, corresponding to the entry in the Grub bootup menu (first entry is 0, second is 1, etc.)
- You can change the "hidden timeout" (no menu); and also display the countdown (
GRUB_HIDDEN_TIMEOUT_QUIET=false) - You can force the grub menu to show by commenting out the two
GRUB_HIDDENlines with a#at the beginning of the line And set the grub menu timeout (default is 10 seconds)
Make your changes, press Ctrl + S to save and Ctrl + Q to exit
- Important: Open a terminal with Ctrl + Alt + T and type
sudo update-grubto apply the changes you just made - Reboot and you should see your timeout/default entry change
Linked Question:
10If you read the file that you are editing in the example above (/etc/default/grub), you will notice that the very first couple lines instruct you to run update-grub after making changes in order to update the actual file that grub reads to "get its instructions" (/boot/grub/grub.cfg). Note that you must actually run it with the sudocommand first as you need root privileges to actually run the command (which is why the poster above said to type sudo update-grub). This will cause the changes you made to be written to /boot/grub/grub.cfg. The very next couple lines tell you that you can read the full documentation of options in that file (again, /etc/default/grub) by typing info -f grub -n 'Simple configuration'.
That said, set GRUB_TIMEOUT to -1 if you want to set the "grub time" to be indefinite. In other words, it will never automatically boot. You will have to make a selection.
Finally, to answer your question, here are the descriptions of those "grub hidden lines" straight from the above-referenced documentation:
GRUB_HIDDEN_TIMEOUT Wait this many seconds for a key to be pressed before displaying the menu. If no key is pressed during that time, boot immediately. Unset by default.
GRUB_HIDDEN_TIMEOUT_QUIET In conjunction with `GRUB_HIDDEN_TIMEOUT', set this to `true' to suppress the verbose countdown while waiting for a key to be pressed before displaying the menu. Unset by default.
I hope this helps!
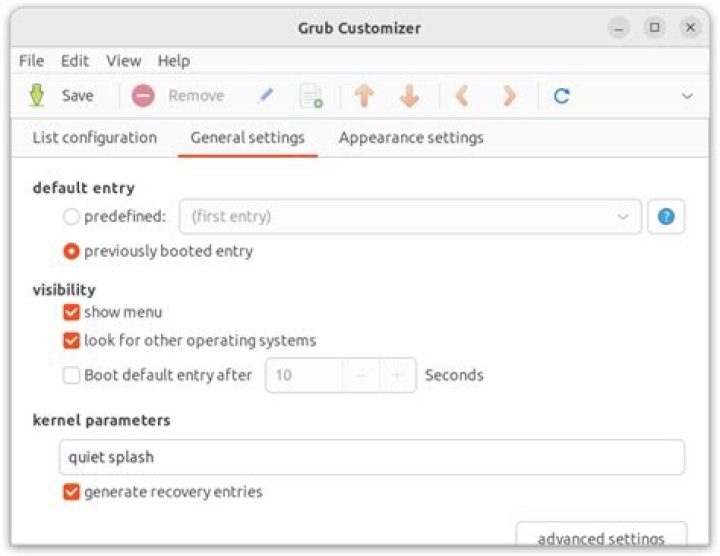
0You can use an application called Grub Customizer. It is much more easier.
You can install it by:
sudo add-apt-repository ppa:danielrichter2007/grub-customizer
sudo apt-get update
sudo apt-get install grub-customizer
If you are getting errors adding ppa, it is possible that grub-customizer is already included. Try installing without adding the ppa.
There is an How-To Geek article about it, How to Configure the Linux GRUB 2 Boot Menu the Easy Way. Also, there is a solved thread on the Ubuntu Forums, Change boot order in GRUB 2 that mentions this tool.
Here are some screen shots of this software:
I followed the first answer but it seems to need updating if you are dual booting with Windows 7 Pro and Ubuntu 16.04. Also make sure secure boot is off in the BIOS.
a) First he says use Alt + F2 when I think he wants to use to open a terminal window. In my case it is Ctrl+Alt+T.
b) In the first entry gksudo gedit /etc/default/grub the gksudo command is not installed by default in Ubuntu 16.04. To get around this do the following in Terminal:
sudo -i and press Enter and give your password and then Enter again.
then type:
gedit /etc/default/grub and press Enter.
c) You will now see the grub change menu as illustrated in answer 1. Follow his answer until he gets to Ctrl + S to save the changes. This doesn't work in Ubuntu 16.04 but you should see a save button in the upper right corner of the screen. Click on that.
d) Ctrl + Q to quit.
e) Next type sudo update-grub and Enter
f) Type exit. You need to do this twice.
g) Reboot
I found that on my computer after a few logons the boot process would not show the grub screen at start up and therefore I could not get into Ubuntu as I had set Windows as my default bootup with a 7 second delay in case I wanted to get into Ubuntu.
To correct this problem you need to get into Windows.
Click on the start menu and type
CMDin the search box.Right click on the CMD line which should be at the top of the screen produced by the right clicking.
Click on run as administrator.
On the command line type
bcdedit /set {bootmgr} path \EFI\ubuntu\grubx64.efi. This entry has the effect of registering the grub menu with the windows boot manager. (Credit to: Grub not showing on startup for Windows 8.1 Ubuntu 13.10 Dual boot)Finally, I rebooted back into windows.
I hope this helps.
5Using default entry identified with a number astonished me since it was introduction in GRUB. This is really bad idea. There are many situations that will result in a numbering change (i.e. updates with backed up entries).
Instead, use SAVED to remember last chosen entry. Update /etc/default/grub with:
GRUB_DEFAULT=saved
GRUB_SAVEDEFAULT=true
Then apply GRUB update with:
sudo update-grubReference:
2This doesn't work for me on 16.04, too.
But I fixed it by changing the file /boot/grub/grub.cfg
sudo vim /etc/default/grubsudo update-grub
sudo chmod u+w /boot/grub/grub.cfg
sudo vim /boot/grub/grub.cfg###segment in /boot/grub/grub.cfg:
set timeout_style=menu
if [ "${timeout}" = 0 ]; then #set timeout=10 # comment this original set timeout=0 # add this
fi
sudo chmod -w /boot/grub/grub.cfg
rebootIn 20.10 (at least) with an EFI based machine you need to specify GRUB_RECORDFAIL_TIMEOUT as the timeout due to what is in my opinion a bug ()
As such your /etc/default/grub should contain:
GRUB_RECORDFAIL_TIMEOUT=10for a 10 second timeout.
TO update the grub config and check the correct output:
sudo update-grub && grep -B3 "set timeout=" /boot/grub/grub.cfgAnd you should see:
...
if [ $grub_platform = efi ]; then set timeout=10
...
I think you have a line like this:
GRUB_TIMEOUT_STYLE=hiddenChange it to:
GRUB_TIMEOUT_STYLE=menuAnd comment all lines regarding HIDDEN features.
It can be done easily without any codes. Just follow these steps.
- Open file system.
- Open
/etcfolder. - Open
defaultfolder. - Find
grubfile and open it withleafpad(or any other text editor). - Set
GRUB_TIMEOUTto your need and save it. - Now open terminal and type
update-grub. - Reboot your system.
That's it.
About setting Grub default entry, you can use (in at least Ubuntu 20+, CentOS 7+, and Debian 10+) grub-set-default.
You use this in combination with a menu entry in your grub.cfg file (on my machine stored on /boot/grub/grub.cfg).
For instance, if I wanted to load menu entry:
menuentry 'GNU/Linux, with Linux 5.10.0-rc5.bm.1-amd64+' --class gnu-linux --class gnu --class os $menuentry_id_option 'gnulinux-5.10.0-rc5.bm.1-amd64+-advanced-f3257130-7310-45a9-990b-d0393ee336f5'Then I can do grub-set-default "GNU/Linux, with Linux 5.10.0-rc5.bm.1-amd64+" to set this entry to be the default. You can verify it worked by checking grubenv (stored on my machine at /boot/grub/grubenv). Mine says
saved_entry=GNU/Linux, with Linux 5.10.0-rc5.bm.1-amd64+Make sure that you have GRUB_DEFAULT=saved in your /etc/default/grub file.
You could also set a one-time only boot using the command grub-reboot, in the same way as above.